Inspections
After the design report goes out, a project that needs an engineer's inspection moves to the Inspection tab. The client tells you when the work is scheduled, your engineer verifies the installation, and Structra writes the inspection report and sends it.
Which projects are inspected
A project goes through inspection only if Engineer Inspection Required? was ticked when it was created. The project page shows the answer on the Details tab, under Permit Information, as Permit Required.
When you set a project to Design Finished, Structra sends the design report. A project with the box ticked then moves to the Inspection tab. Any other project becomes Project Finished. See Finish and send the report.
The inspection path
| Sub-status | What is happening | What moves it on |
|---|---|---|
| Inspection Not Ready | Structra is checking whether the inspection information is already filled in. | Structra, at once. |
| Waiting On Inspection Information | Something is missing. Structra emails the client’s admins that inspection details are needed. | The client, or your staff, submits the inspection information. |
| Inspection Verification Needed | The information is in. Structra emails your engineers and admins that a verification is waiting. | You press Accept & Proceed or Reject & Send Back. |
| Inspection Verification Rejected | The client has been emailed your reason and needs to correct the information. The reason also shows on the project. | The client, or your staff, presses Resubmit for Verification. |
| Inspection Verification Accepted, then the Inspection Report sub-statuses | Structra is writing the inspection report. | Structra. It takes a few seconds. |
| Finished Inspection Report | The report is written and waits for a final check. | You set the sub-status to Inspection Report Finished. |
| Inspection Report Finished | Structra sends the report to the client. | Structra. The project becomes Project Finished. |
Inspection information
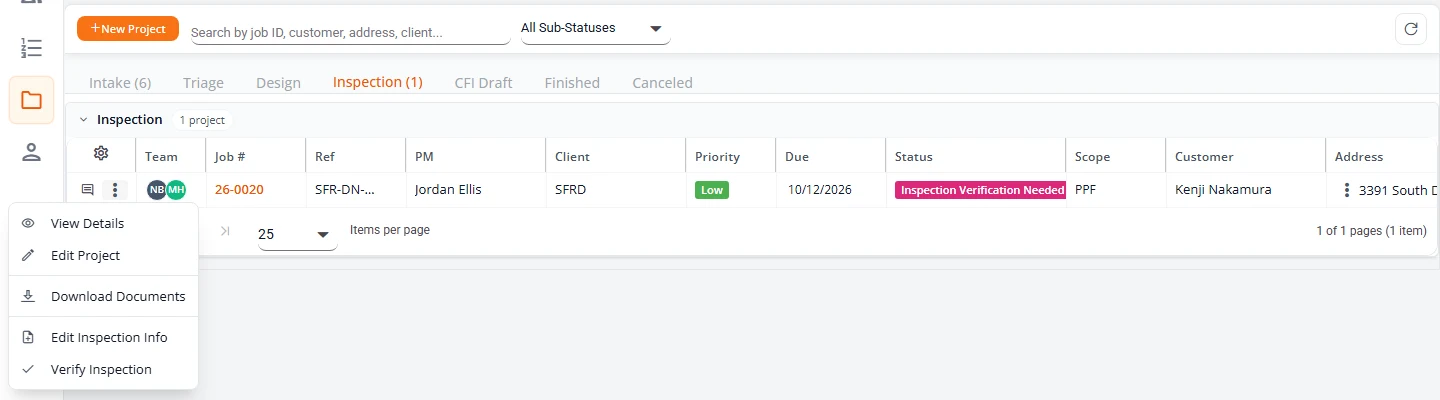
Inspection information is the permit number, the foreman, the construction dates and any photos of the finished installation. The client normally provides it. See Inspection details in the client guide. Your own staff can enter or correct it too.
- Open the project and press Add Inspection Info at the top right. Or, on Projects, open the menu at the start of the project’s row (the three dots) and choose Add Inspection Info. On a project that is not waiting for the information, the menu item reads Edit Inspection Info.
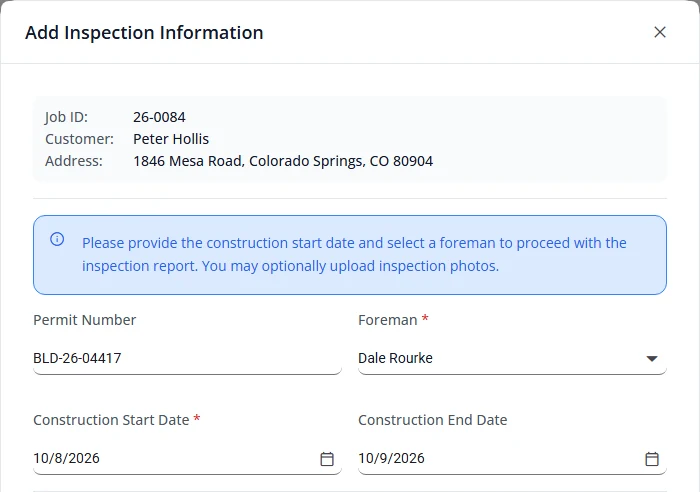
- Type the Permit Number.
- Choose the Foreman. The list holds the client’s users with the Foreman role.
- Set the Construction Start Date and the Construction End Date. Set the Inspection Date if the inspection has happened; if it is left blank, Structra fills in that day when the inspection report is made.
- Under Inspection Photos, add photos of the finished installation if you have them. Photos are optional.
- Press Submit Inspection Info. The project moves to Inspection Verification Needed.
Change it later
Once a project has left Waiting On Inspection Information, the box is titled Edit Inspection Information and its button reads Save Changes. Saving does not change the project’s status. It adds a comment to the project, visible to the client, that names who changed the information and which fields.
Add a foreman
A foreman is one of the client’s people. If the right person is not in the list, add them from the same box.
- Open the Foreman list and choose + Add New Foreman.
- Fill in First Name, Last Name and Email. Phone Number and Job Title are optional. Role is already set to Foreman.
- Press Create User. The new foreman is added to the client’s users and chosen in Foreman for you.
Client users are managed on the client page. See Add a client’s people.
When inspection information locks
Inspection information can be changed at any status up to the end. It locks when the project becomes Project Finished. From then on, Add Inspection Info and Edit Inspection Info no longer appear, for your staff or for the client.
The same is true of a project that is cancelled, or that has a cancellation request waiting. See Cancel a project.
To change it after that, the project has to be reopened. See Reopen a project for a change order.
Upcoming Inspections
Open Inspections in the Organization Admin’s menu. The page has two tabs, Upcoming Inspections and Inspection Board. Upcoming Inspections lists every project on the Inspection tab that has a construction date in the next 14 days, and any whose date has passed while the project is still in inspection.
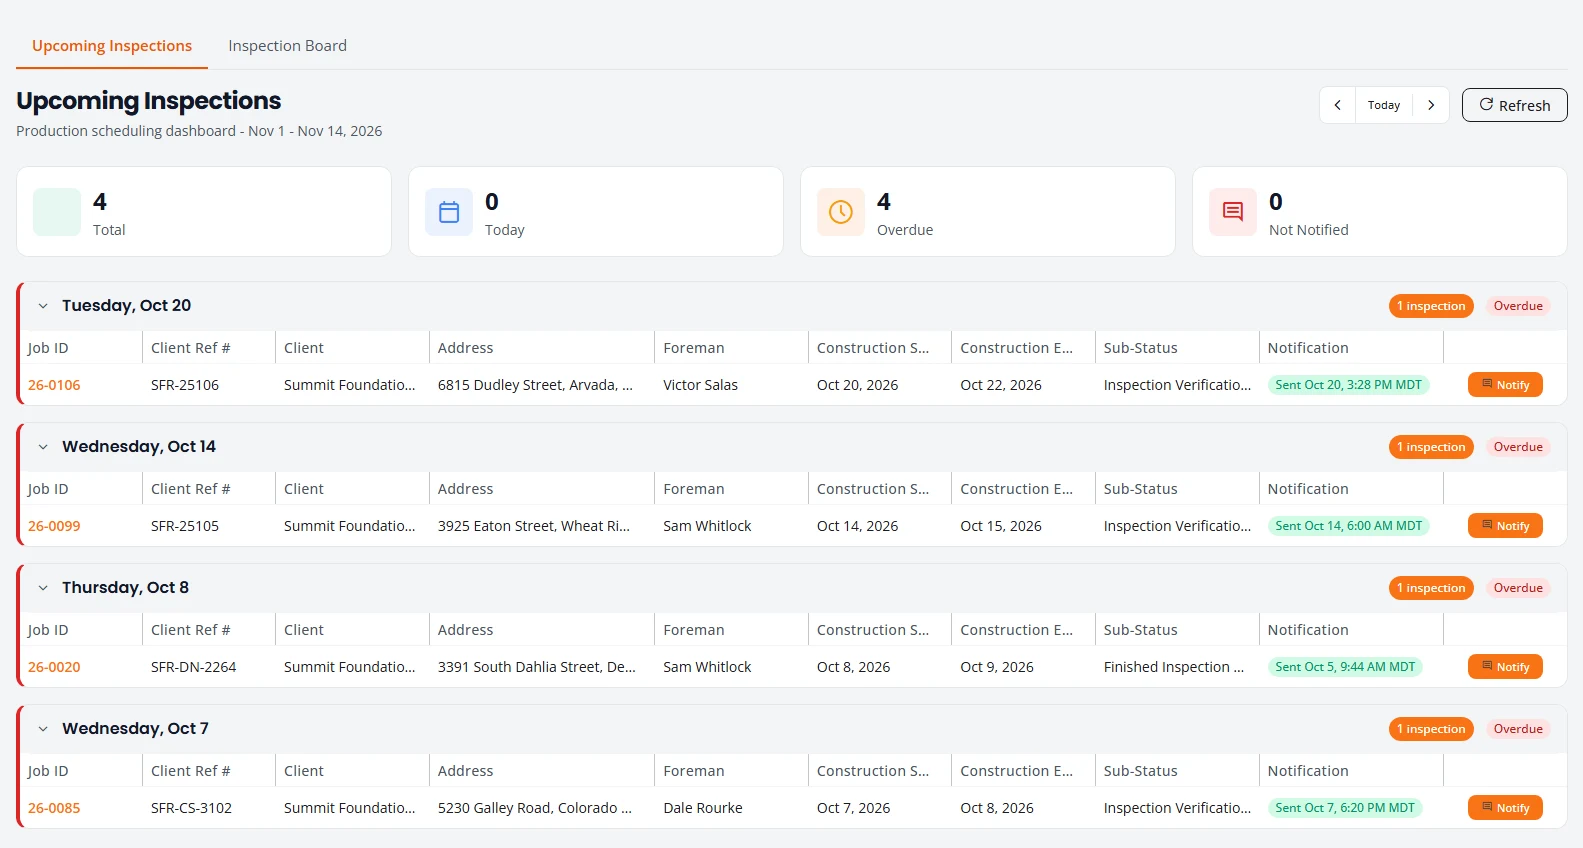
- Counters. Total, Today, Overdue and Not Notified.
- Groups. Projects are grouped by day, using the earlier of the two construction dates. A past day is marked Overdue and the current day Today.
- Open a project. Select its job number.
- Notification. The column shows No Foreman, Not sent, or Sent with the date and time.
- Sub-Status. The project’s sub-status, worded as it is everywhere else in Structra.
- Notify. Press Notify to remind the project’s foreman by email, text message or both. See Notify the foreman. A row with no foreman has no Notify button.
Notify the foreman
Remind the foreman about an upcoming install or inspection. You choose how to reach them and see the exact message before anything is sent.
- On the Upcoming Inspections tab, press Notify on the project’s row. The Notify the foreman window opens, with the foreman’s name beside To.
- Under Send by, tick Email, Text message or both. Email is ticked for you when the foreman has an email address. If they have none, Text message is ticked instead, when a text can be sent.
- Check the previews. The text message is shown as the foreman will read it. The email shows who it is From, its Subject, and the message itself with your firm’s logo and colors.
- Press the send button. Its name follows your choice: Send email, Send text or Send email and text. Once a reminder has gone for the job it reads Send email again, and so on.
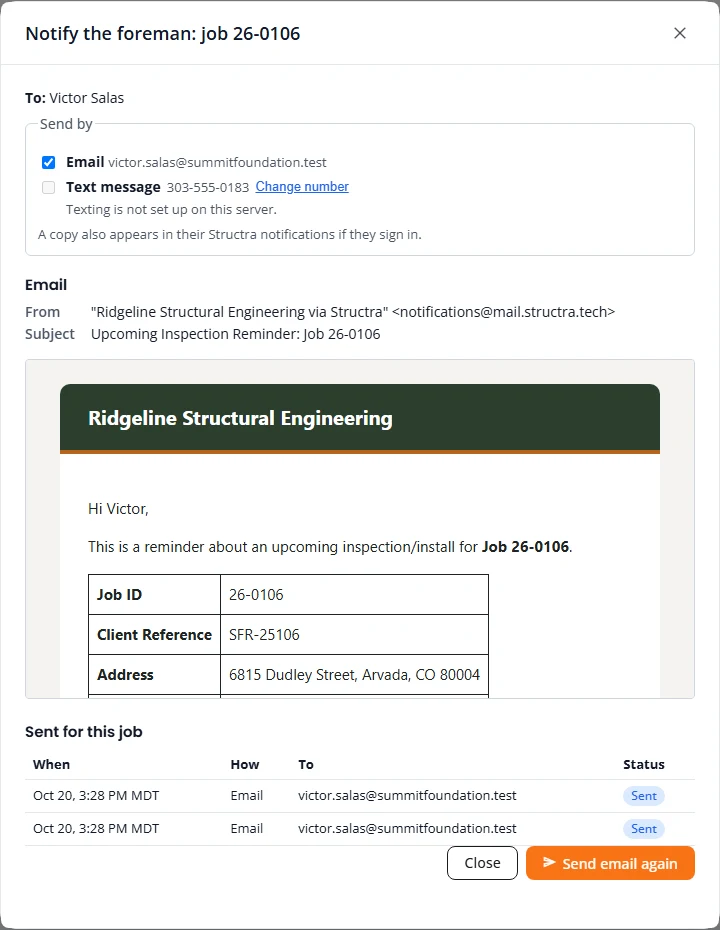
The email and the text give the job number, the client reference, the address and the construction dates, and ask the foreman to call the engineer. The text starts with your firm’s name. The first text Structra sends to a number ends “Reply STOP to opt out.”
The text gives your office phone number, so the foreman can tap it to call. Structra takes it from Phone under Business details on the Branding tab of Settings. See Branding. With no number there, or one a phone cannot dial as written (with an extension, for example), the text just says “Please call the engineer.”
The text is kept to one message. When the full address makes it too long, Structra shortens it: first to the street only, then with shorter wording such as “insp” for inspection, then a shorter street, and as a last resort no address. The job number is always there. A typical text reads: “Ridgeline Structural Engineering: Reminder for job 26-0106 (SFR-24187) at 1418 Larkspur Ln (install Oct 20, insp Oct 22). Call the engineer at 303-555-0142.”
A copy also appears in the foreman’s Structra notifications, if they sign in.
Add or change the foreman’s mobile number
Foremen change phones. Beside Text message, select Change number, or Add a mobile number if there is none. Type the number and press Save number. Enter 10 digits, for example (816) 555-0142. The number is saved to the foreman, so it is there next time, for any of their jobs.
When a text cannot be sent
Text message cannot be ticked, and the window says why, when:
- The foreman has no mobile number. Add one as above.
- The number is not one Structra can text. Correct it.
- The foreman replied STOP to an earlier text. They can reply START to get texts again.
- Texting is not set up on your Structra server. The window says “Texting is not set up on this server.”
If the foreman has no email address and cannot be texted, nothing can be sent. Add a mobile number to text them.
If one way fails
When you send both, each goes on its own. If the email goes and the text fails, or the other way round, the one that worked is still sent. The window says who it was sent to and how, and shows the reason the other one failed. The job counts as notified when at least one went: the row shows Sent with the time. If neither went, nothing is recorded and the window says why.
Sent for this job
The bottom of the window lists the reminders already sent for the job, newest first, with When, How (Email or Text), To and Status. It is your record of every time the foreman was reminded about the job: the ones sent from this window, the automatic reminders before the inspection date, and the daily “scheduled today” email, which lists all of a foreman’s jobs for the day and shows on each of them. Under Email is the email’s subject, which says which reminder it was. After a send the window keeps checking for delivery for about two minutes and shows Checking for delivery… meanwhile. Open the window again later to see the latest status.
| Status | Meaning |
|---|---|
| Sending | On its way. |
| Sent | Handed over for delivery. No word yet that it arrived. |
| Delivered | It reached the foreman’s inbox or phone. |
| Delayed | Delivery is taking longer than usual. It is still being tried. |
| Bounced, not delivered | The email address refused it. Check the address. |
| Not delivered | The text did not reach the phone. Check the number. |
| Marked as spam | The foreman marked the email as spam. |
| Not sent: address blocked | Email to this address is blocked, so it was not sent. Check the address. |
| Not sent: daily limit | The day’s sending limit was reached. Try again later. |
| Failed | It could not be sent. Hover over the status, or read the line under it, for the reason. |
Inspection Board
The Inspection Board tab shows one week at a time, Monday to Sunday. It lists the projects on the Inspection tab whose construction start or end date falls in that week.
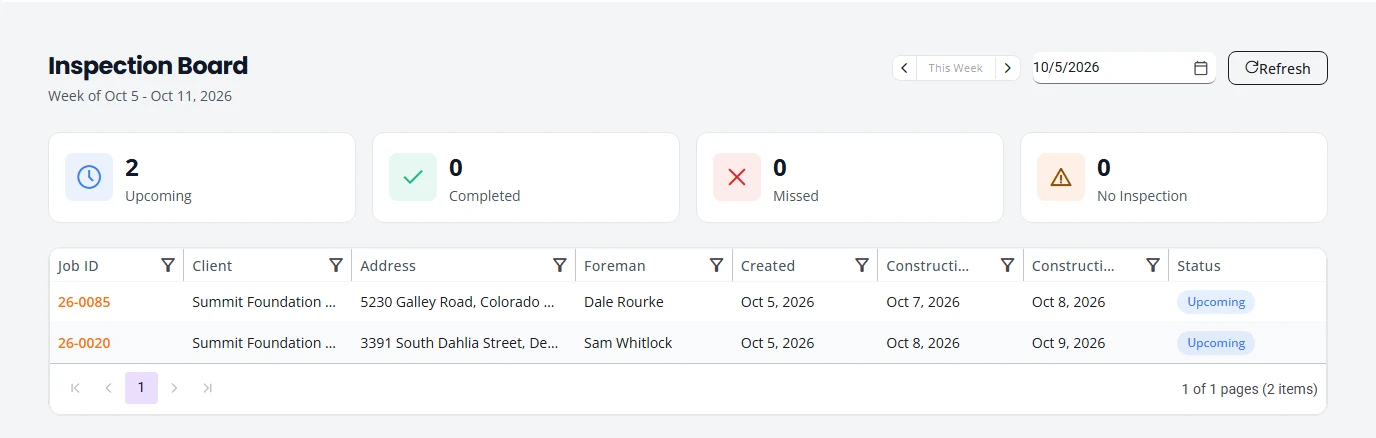
Use the arrows to change week, the date box to jump to a date, and This Week to come back. Each row’s Status is worked out for you.
| Status | Meaning |
|---|---|
| Completed | The inspection was accepted in the verification box. |
| Upcoming | The construction end date is today or later. |
| Missed | The construction end date has passed and the inspection has not been accepted. |
| No Inspection | The project has no construction end date. |
The Created column is the day the project was created. Construction Start and Construction End are the dates from the inspection information.
Verify an inspection
Verifying is the engineer’s check that the work was installed as designed. A project waiting for it shows Inspection Verification Needed.
- On Projects, open the Inspection tab, open the menu at the start of the project’s row and choose Verify Inspection. Or press Verify Inspection at the top of the project page, or Review Inspection on the project’s card in the Inspection Verification lane of the Task Dashboard. All three open the same box.
- Read Submitted Inspection Information and look through Inspection Photos. Select a photo to enlarge it. You can add photos here too.
- Under Verification Decision, press Accept or Reject.
- If you accept, three choices appear under How was the inspection verified?. Pick one: On-Site Inspection (someone visited the site), Photo Documentation (you reviewed the photos submitted) or Video Call Verification (you walked through it on a video call). You must pick one to accept. Verification Notes are optional.
- If you reject, type the Rejection Reason. It is required. The client reads it in an email and on the project.
- Press Accept & Proceed or Reject & Send Back.
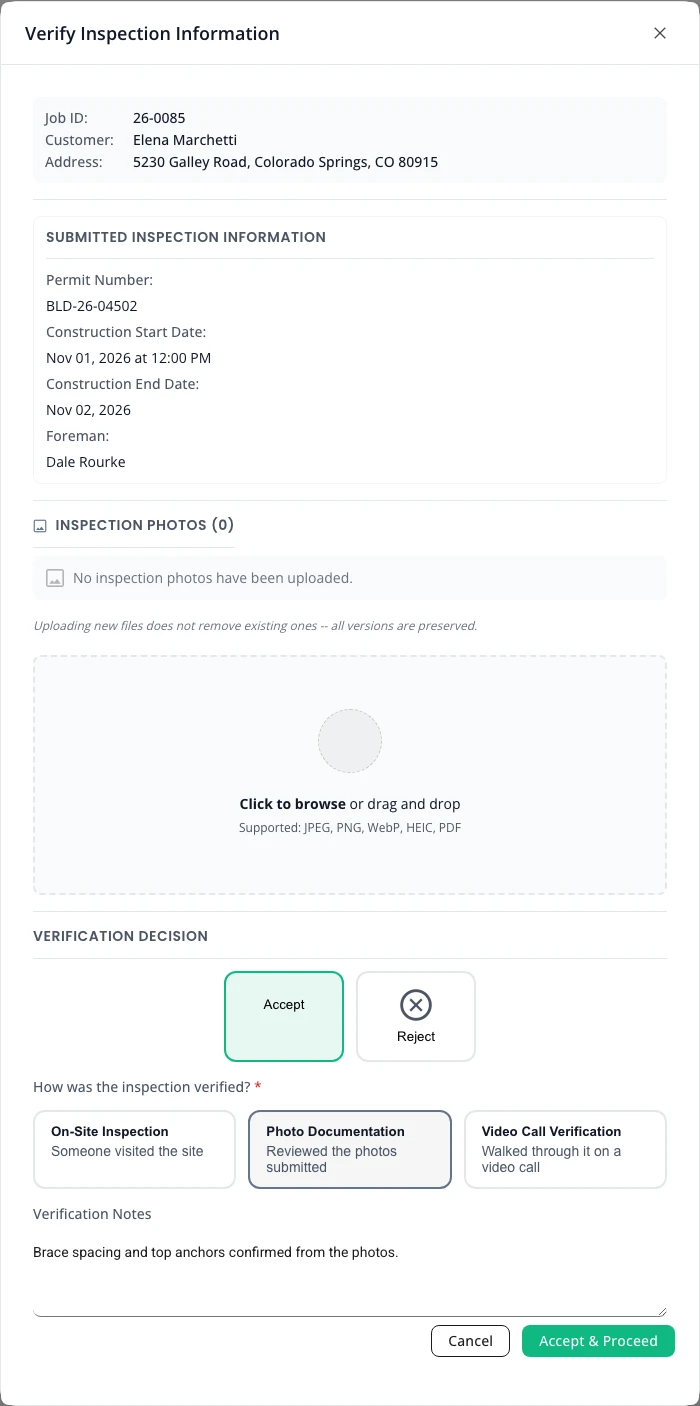
Accepting starts the inspection report. The project page then shows how it was verified on the Details tab, under Permit Information, as Inspection Verified, for example “Verified from photos”. Rejecting sets Inspection Verification Rejected and emails your reason to the client’s admins, your engineers and your admins.
After a rejection
A rejected project shows a notice at the top of its page, “Inspection verification was rejected”, with your reason after Engineer’s notes:. The client sees the same notice. It has two buttons, Edit Inspection Info and Resubmit for Verification.
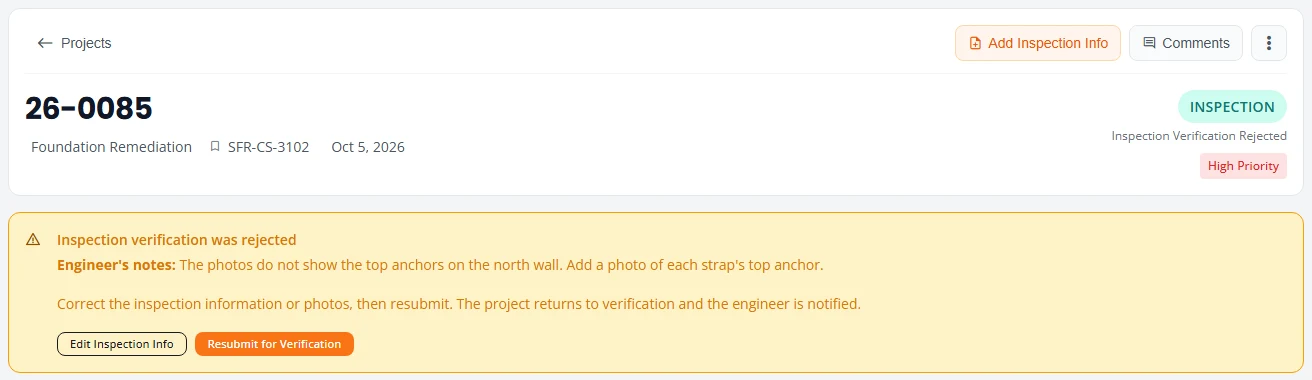
- The client presses Edit Inspection Info, corrects the information or adds photos, and presses Save Changes. The project stays at Inspection Verification Rejected.
- The client presses Resubmit for Verification. The project returns to Inspection Verification Needed, and Structra emails your engineers and admins that a verification is waiting.
- Verify the inspection again.
Your own staff see the notice too and can press either button, for example when the client sends the correction by phone. The client’s side is in Inspection details in the client guide.
The inspection report
When an inspection is accepted, Structra writes the inspection report as a PDF. It carries your logo, the client, the job number and client reference, the property address, the permit number, the construction start date, a paragraph for each scope on the project, and the engineer of record’s name, initials and signature image. It is listed on the project’s Files tab under InspectionReport.
As with the design report, any seal or digital signature is applied by the engineer in Bluebeam, not by Structra.
The project then waits at Finished Inspection Report, and Structra emails your team that the report is ready for final review.
- Open the project and read the report from the Files tab.
- Select the project’s status label, set Sub-Status to Inspection Report Finished and press Save Changes.
Structra then:
- Adds the inspection report line to the client’s open invoice.
- Emails the inspection report to the client’s admins as a PDF attachment. Your Organization Admins get the same email.
- Sets the project to Project Finished. See Finishing, revisions and cancellations.
If the report fails
A project that shows Inspection Report Failed has no report. Structra emails your staff the reason. Two causes are a missing construction start date and a scope with no inspection wording set up for your organization. Fix the cause, then set the Sub-Status to Ready For Inspection Report to run it again.
What is not here yet
- Structra does not book inspections or put them on a calendar. The dates are the ones typed into the inspection information.
- There is no button for Inspection Report Finished on the Task Dashboard. Set it in Quick Edit Project Status.
Stuck on something? Email [email protected] and tell us what you were trying to do.