Onboarding your firm
How a new engineering firm gets set up in Structra: what is ready on the first day, the setup to do in your first hour, and how deeper, firm-specific workflows are added with Structra's team.
What your firm gets on day one
A new firm starts with one project type switched on: Ad Hoc. It suits work that is scoped and priced job by job, and it needs no setup beyond your own details.
- Your clients can start Ad Hoc jobs themselves from their own Structra login. They describe the work; your office sets the fee in triage before approving the job. You can turn client jobs off. See Who can start a job.
- A starter engagement letter is ready for you to edit. See Set up your engagement letter.
- QuickBooks is optional. Without it, Structra finalizes your invoices and emails them to your clients as PDFs. See Invoices, with or without QuickBooks.
| You can | Covered in |
|---|---|
| Take in leads and work them | Leads and engagement letters |
| Send an engagement letter and have it signed online | Send an engagement letter |
| Turn a signed lead into a project with its scope and fee | Convert a lead to a project |
| Triage, assign and track the project | Intake and triage, Projects and statuses |
| Deliver the signed and sealed report to the client | Deliverables |
| Invoice the job at the quoted fee | Billing and QuickBooks |
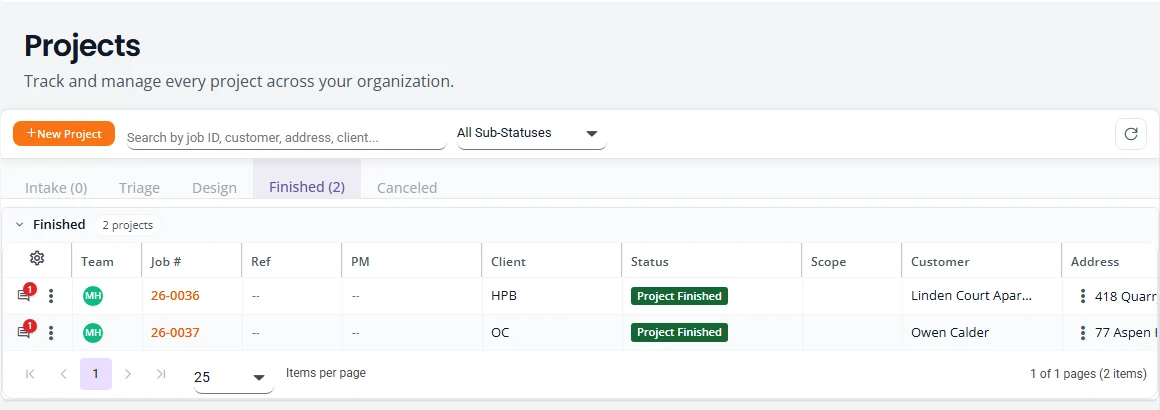
Workflows built around one kind of work, such as foundation remediation, are added later with Structra’s team. See Integrated workflows.
Your organization and first sign-in
Your organization and your first Organization Admin are created either by Structra’s team or when you sign up on our website. You do the rest.
If you signed up yourself, you are the first Organization Admin. You set your password from the sign-up email and go straight in, and your firm starts in the time zone your computer is set to. The steps below are for someone Structra’s team, or a colleague, added.
- Open the email called “Welcome to Structra!” and press Set Password. The link works for 72 hours.
- On Set a new password, fill in New password and Confirm new password, and press Reset password.
- Press Go to sign in and sign in with your email and the new password. The sign-in page is worth a bookmark.
You land on Dashboard. Your plan and trial are under Subscription in the menu. For plans, see Pricing. The menu and what each role can do are in Getting started.
The Finish setting up list
Until your firm is set up, an Organization Admin sees a Finish setting up list on Dashboard. It shows how many items are done, such as “2 of 5 done”. Select an item to go to the screen that does it. A done item is ticked.
| Item | Done when |
|---|---|
| Choose your engineer of record | You have picked the engineer whose name and signature go on your letters, and that engineer has a signature on file. If the signature is missing, the item reads Upload the engineer’s signature. See Engineer credentials and signature. |
| Set your time zone | Your firm has a time zone. Due dates and letter dates use it. See Time zone. |
| Add your logo and letterhead | A logo is uploaded. See Add your logo and details. |
| Add your first client | You have at least one client. See Add clients and their people. |
| Connect QuickBooks (optional) | QuickBooks is connected. You can skip this one. See Invoices, with or without QuickBooks. |
| Add a payment method | Your plan is paid for. During a free trial it reminds you to add a card. See Subscription. |
The list goes away by itself once every item that is not optional is done. To put it away sooner, press Hide checklist. That hides it for everyone in your firm.
Add your logo and details
Your logo, colors and contact details go on the email your customers receive, and at the top of your documents.
The quickest start is your own Word letterhead. On the Branding tab, press Import from Word in the Letterhead card and choose the file. Structra fills in your logo, contact details and layout in one step. Check the preview, then press Save. To set things by hand instead:
- Select your picture at the top right, then Settings, then the Branding tab.
- Press Upload logo. Use a PNG or JPEG up to 1 MB. A wide logo about 600 pixels across works best.
- Set your Primary color (the header band and buttons) and Accent color (links and highlights).
- Fill in Legal name, Phone, Website and Mailing address. They print in the footer of every customer email.
- Press Save.
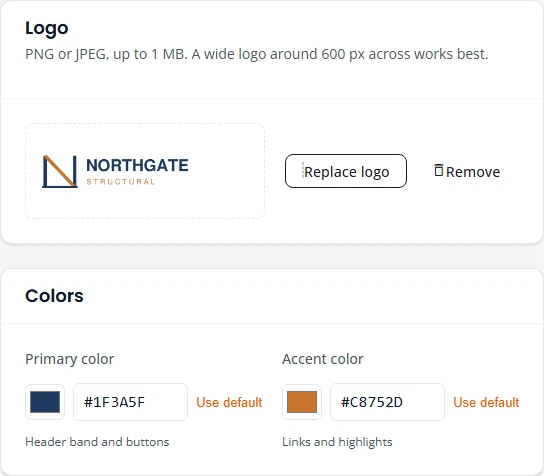
More, including the letterhead and the Re: lines, in Settings.
Set your sender name and reply address
When a customer replies to an email from Structra, the reply should reach your office.
- In Settings, open the Email tab.
- Under Sender, check From name and type your office address in Reply-To. Press Save.
- Press Send test email. The test goes to your own address, so you see what customers see.
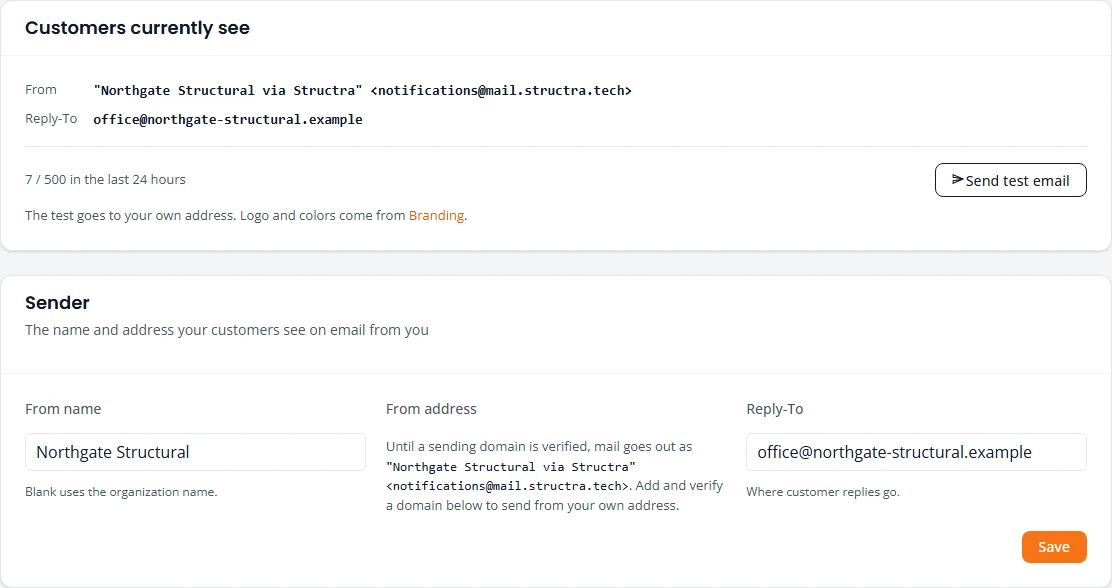
To start with, your email goes out as your firm’s name “via Structra”. Sending from your own domain is covered in Settings.
Add your engineers and designers
- Open My Organization in the menu and select the Users tab.
- Press Add User. Fill in First Name, Last Name, Email and Job Title.
- Choose a Role: Organization Admin, Engineer or Designer.
- Press Add User. The person gets the same welcome email you did.
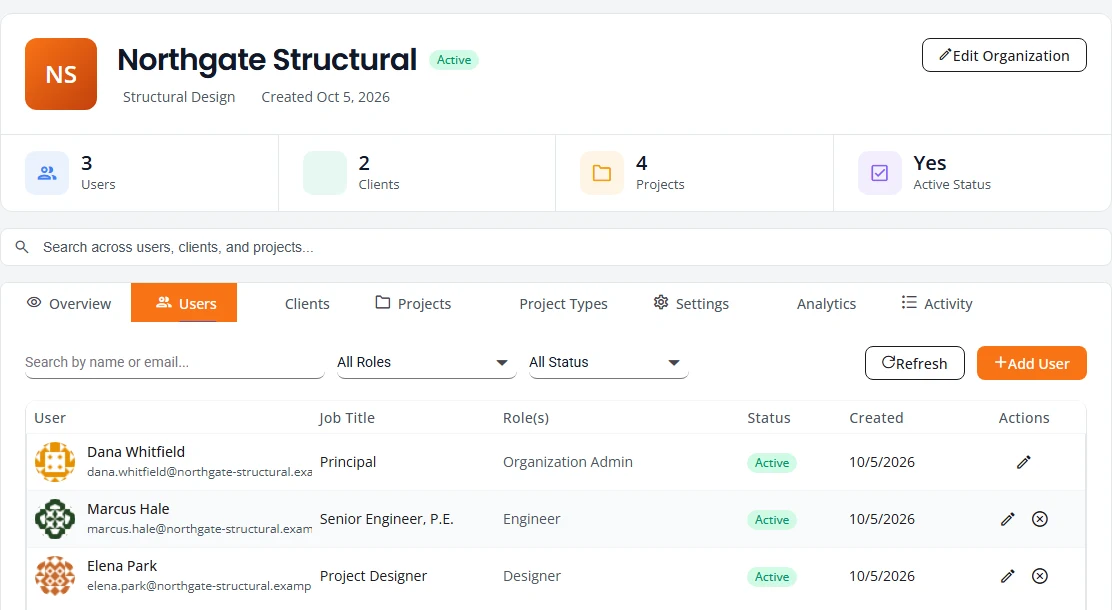
Each engineer then adds their license details and signature image on their profile. Reports and letters are signed with that stored signature, so there are no seal or signature files to send to Structra. Then choose your firm’s default engineer of record. See Engineer credentials and signature. Roles are compared in What each role can do.
Add clients and their people
A client is a company or person you do work for. You do not have to add one before your first job: converting a lead creates the client for you. Add a client yourself when you already work with them.
- On My Organization, select the Clients tab and press Add Client.
- Type the Client Name and press Add Client.
- Open the client, select its Users tab and press Add User for each person who should sign in. Give the person who runs their account the role Client Admin, and other office staff Office.
A client’s users see their own projects, comment on them and download what you deliver. They have their own guide: client admins. More in Clients, branches and users.
Set up your engagement letter
The engagement letter is the agreement a customer signs online before work starts. An Ad Hoc project needs a signed letter before design can start. A new firm already has a starter letter called Engagement Letter, written in your firm’s name. Make it yours before you send it.
- Open Agreement Templates in the menu and press Edit on Engagement Letter.
- Work down the editor: the letterhead, the date and “Re” block, your sections, the closing and signer, and the client’s acceptance. The starter has sections for the scope of work, fees and billing, limitations, confidentiality, termination and governing law. Change the wording to match how you work. Merge fields fill in the customer’s details on each letter.
- Press Save new version.
To start again from nothing, press New template and choose Blank letter.
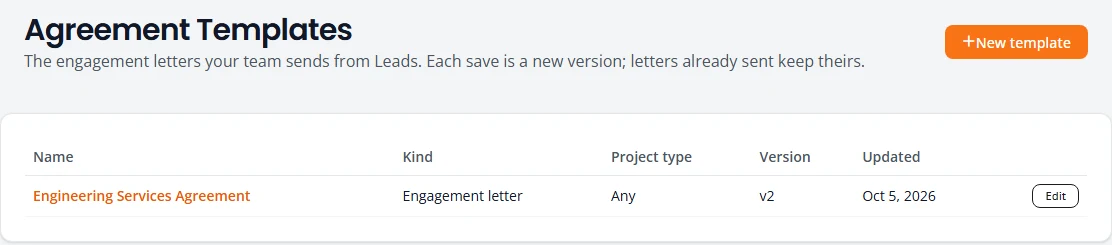
The editor is covered step by step in Set up your engagement letter. Have the wording checked for your state before you rely on it.
Run your first job
Run one job end to end, with yourself as the customer, before you use Structra with a real one. This is the whole Ad Hoc workflow.
- Add a lead. On Leads, press New lead, fill it in and press Save lead. See Add a lead.
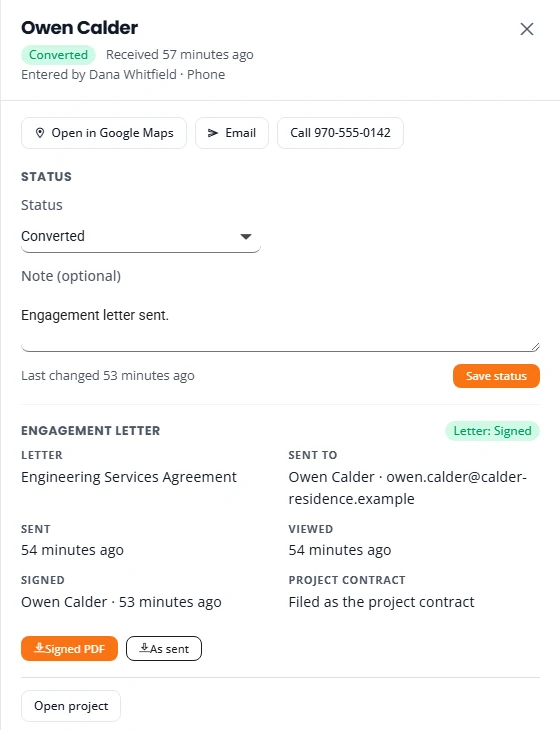
- Send the engagement letter. Open the lead. Under Engagement letter, press Prepare engagement letter, fill in the recipient and the letter’s fields, check it with Preview PDF and press Send to client.
- The customer signs. They open the email, press Review and sign, type their name, sign, tick the consent box and press Sign engagement letter. You are emailed the signed PDF, and the lead shows Letter: Signed.
- Convert the lead. Press Convert to project and set the due date, the scope and the fee. The project starts at Project Intake Initiated, with the signed letter filed as its contract.
- Complete the intake. Open the project, open the menu at the top right and choose Complete Project Intake. Go through the steps and press Submit Intake. The project becomes Ready for Triage Review.
- Triage it. From the same menu choose Assess Intake. Pick the complexity, choose a designer and an engineer if you want to, and press Approve and Close. The project moves to In Engineering Queue. See Intake and triage.
- Do the engineering. The work itself is done in your own tools.
- Sign, seal and deliver. Sign and seal the report in Bluebeam. On the project’s Files tab, under Deliverables, tick as sealed report and press Upload. Press Send to client to email exactly that file. See Send deliverables to the client.
- Finish the project. On Projects, select the project’s status label. In Quick Edit Project Status, choose Design Approved and press Save Changes. Within a few seconds the project reaches Ready For Digital Signature. Then set Design Finished. Structra emails the sealed report to the client’s users, adds a line at the quoted fee to the client’s open invoice, and sets the project to Project Finished.

A job that does not start from a lead
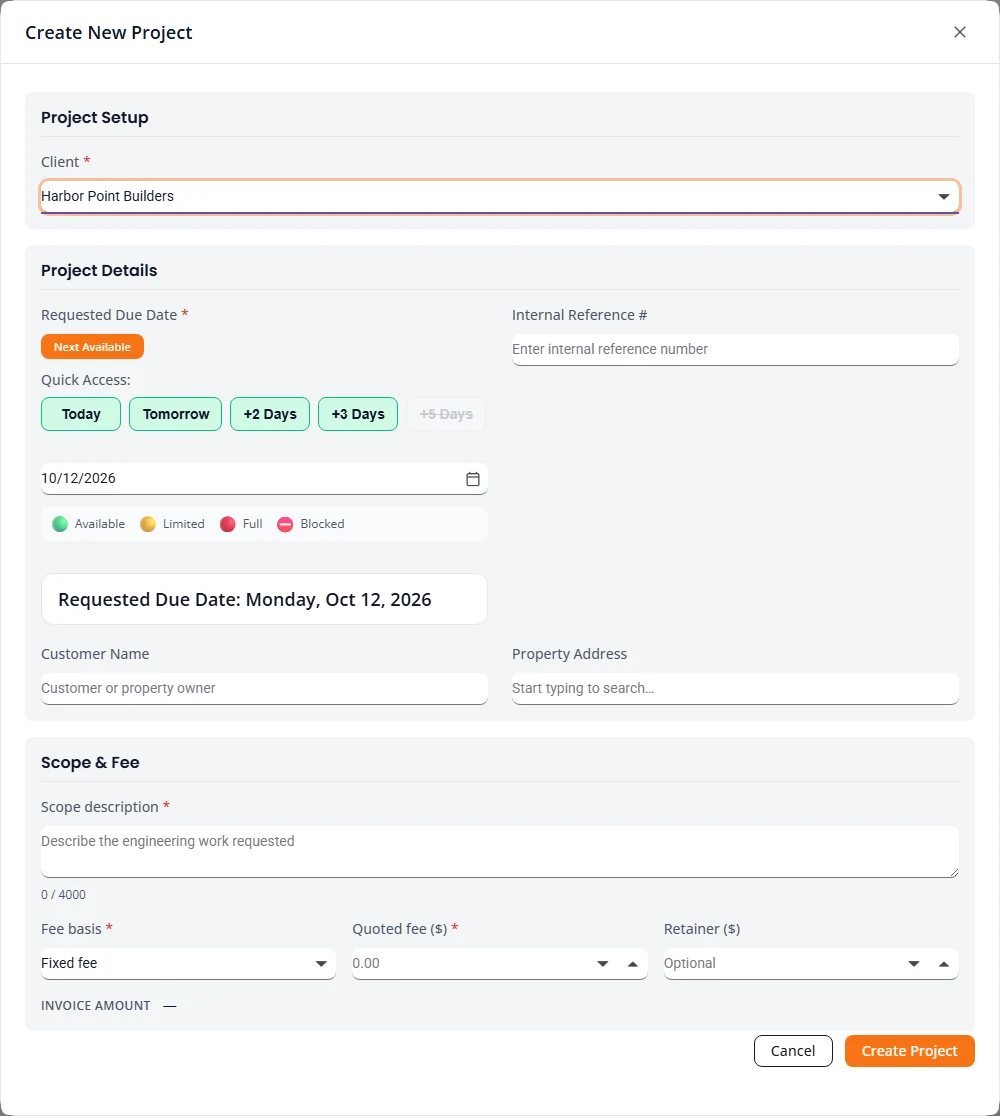
You can also create a project directly. On Projects, press New Project, choose the client, set the Requested Due Date, and fill in Scope description, Fee basis and the fee. Press Create Project.
The box opens on the first due date you can take. If the usual date falls on a weekend, a holiday or a full day, it moves to the next open day.
Invoices, with or without QuickBooks
Structra keeps an open invoice for each client and adds a line when work is delivered. You do not need QuickBooks to bill.
- Without QuickBooks. You finalize the invoice in Structra and press Send to Client. Structra emails the client a PDF of the invoice, from your firm, to the billing email on the client’s Billing tab. Add that email for each client before you send.
- With QuickBooks Online. Finalizing creates the invoice in QuickBooks, and QuickBooks emails it to the client.
See Billing and QuickBooks. To connect QuickBooks:
- In the menu, open QuickBooks, then Connection.
- Press Connect to QuickBooks and sign in to QuickBooks when asked.
Then map your clients and items. See Connect QuickBooks.
Integrated workflows
Some firms do one kind of work at volume for a few client companies, foundation remediation being the main example. For that, Structra offers a workflow built around the work itself. The client’s field inspectors record each job on site, Structra assembles the starting document set for the engineer, the drawing and the engineering are checked against your own checklists, and inspections are tracked through to the inspection report.
An integrated workflow is configured for your firm together with Structra’s team. It is not something you switch on yourself, because it is built from your own materials:
- Your report templates. Title pages, cover letter, plan views, specification and installation sheets, for each kind of repair and each product line you design for.
- Your checklists. The drawing and engineering quality checks your team works to.
- Your inspection wording. What the inspection report says for each kind of repair.
- Your clients’ structure. Their branches, their office users and their field inspectors, who get the inspector portal.
- Your due-date rules. Working days, holidays and how much work your team takes on per day.
To start that conversation, email [email protected] or use Contact sales. Tell us the kind of work, roughly how many jobs a month, and who your clients are. You can keep working in the Ad Hoc workflow in the meantime.
The rest of this guide covers both. Design and Inspections describe the foundation remediation workflow.
Stuck on something? Email [email protected] and tell us what you were trying to do.