Settings
Settings are spread over a few places. This page says where each one is, who can change it, and what it affects.
Where each setting lives
| Setting | Where | Who can change it |
|---|---|---|
| Light or dark theme | Your picture, then Settings, General | Everyone, for themselves |
| Notifications | Settings, Notifications | Everyone, for themselves |
| Plan and payment | Subscription in the menu, or the Subscription tab of Settings | Organization Admin. Others can view |
| Email sender and replies | Settings, Email | Organization Admin |
| Logo and colors on email | Settings, Branding | Organization Admin |
| Letterhead and Re: lines on documents | Settings, Branding, Letterhead | Organization Admin |
| Organization name | My Organization, Settings tab | Organization Admin |
| Cover letters | My Organization, Cover Letters tab | Organization Admin |
| Project types, scopes, brands, templates and checklists | My Organization, Project Types tab | Organization Admin |
| Prices | My Organization, Project Types tab. See Client pricing | Organization Admin |
| Engineer credentials and signature | Your picture, then Profile | Each Engineer, and the Organization Admin |
| Default engineer of record | Your picture, then Settings, Engineer of Record. See below | Organization Admin |
| Engagement letter templates and headquarters address | Agreement Templates and Leads. See Leads and engagement letters | Organization Admin |
| Invoice settings and QuickBooks | Billing and QuickBooks. See Billing and QuickBooks | Organization Admin |
| Engineer capacity, time off, holidays and time zone | Capacity in the menu, Engineer availability tab. See Design capacity | Organization Admin. Others can view |
| AI pre-checks for each client | The client page, Edit Client. See AI pre-checks for a client | Organization Admin |
| Sketch rubrics | AI Rubrics in the menu. See AI sketch rubrics | Organization Admin and Engineers |
| Weekend rule for due dates | Not in the app | Structra support. See below |
To open Settings, select your picture at the top right, then Settings. An Organization Admin sees the tabs General, Notifications, Subscription, Email, Branding, Kickback Reasons and Engineer of Record. Engineers and Designers see fewer.
Appearance
On the General tab, the Dark mode switch changes between the light and dark theme. The sun or moon at the top right of every page does the same. The choice is yours alone and is remembered on that browser.
Notifications
The Notifications tab lists every notification Structra can send you, in four groups. Each has a switch. A change is saved as soon as you flip it.
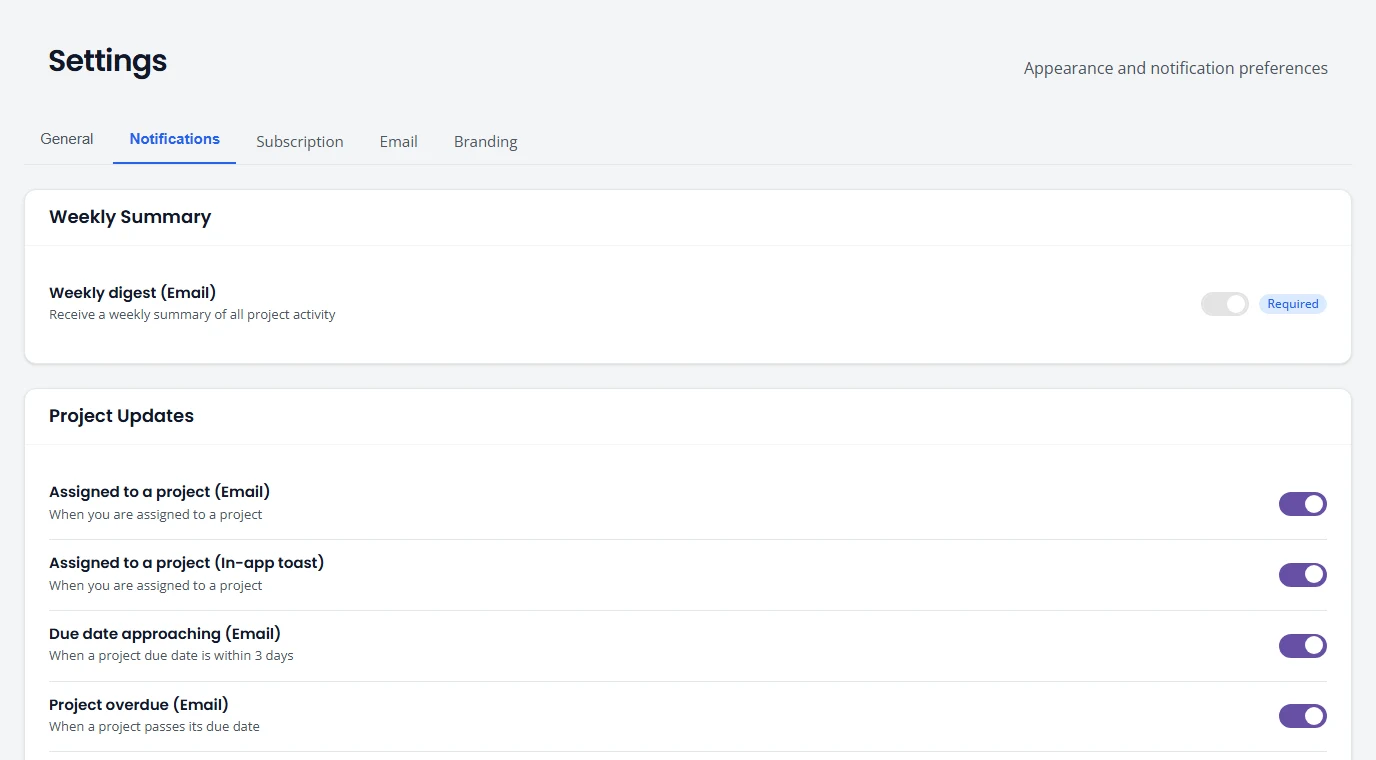
| Group | What is in it |
|---|---|
| Weekly Summary | A weekly digest of project activity, by email. |
| Project Updates | Being assigned to or removed from a project, a status change, a due date within 3 days, and a project passing its due date. |
| Document Updates | A document uploaded to your project, approved or rejected. |
| Comments & Mentions | Someone mentions you in a comment, or comments on a project you are assigned to. |
- The words in brackets say how it reaches you: Email, or In-app toast, a small message that pops up while you are working in Structra.
- A notification marked Required cannot be turned off.
Subscription
Subscription shows your firm’s Structra plan. Everyone on staff can see it. Only an Organization Admin can change it.
- Current plan. The plan name and a status: Active, Trial, Past due or Canceled. During a trial it also shows how many days are left and the date it ends.
- Product, Users and Billing. Which product you are on, how many users you have, and whether a payment method is on file.
- Plans. Until you subscribe, the plans you can choose are listed below.
Choose a plan
- Open Subscription in the menu.
- Under Plans, press the Subscribe button on the plan you want.
- Enter your card details on Stripe’s secure checkout page.
You come back to Subscription with a confirmation. If you subscribe during a trial, your card is saved, the trial continues, and the first charge is on the day the trial ends. If you leave checkout early, nothing is charged and your plan does not change.
Change your card, change plan or cancel
Once you have subscribed, press Manage billing. It opens the billing portal, where you can change plan, update your card, download invoices for your subscription, or cancel.
The Email tab controls how email that Structra sends to your customers on your behalf is addressed, such as an engagement letter.
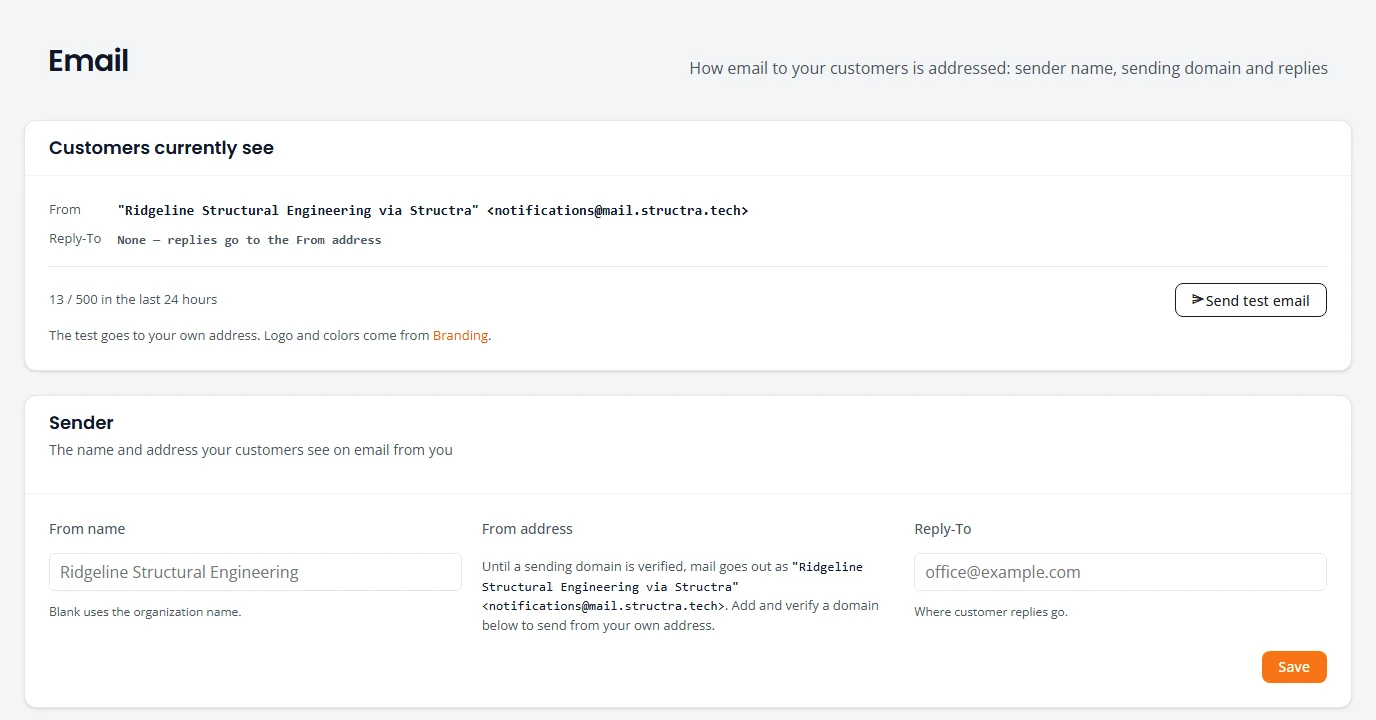
Set where replies go
- Open Settings and select Email.
- Under Sender, type an address in Reply-To. This is where a customer’s reply goes.
- Change From name if you want something other than your organization’s name.
- Press Save.
- Press Send test email. The test goes to your own address.
Customers currently see at the top always shows the exact From and Reply-To in use.
Send from your own domain
To start with, your email goes out as “Your Firm via Structra” from a Structra address. To send from your own address:
- Under Sending domain, type your Domain and press Add domain. A subdomain such as mail.example.com keeps these records apart from your main mail.
- Structra lists DNS records, each with a Type, Name and Value. Add them at your DNS provider. Each has a copy button.
- Press Verify now. DNS changes can take a few minutes to be seen.
- Once the domain is verified, set the From address under Sender and press Save.
- Recent sends lists email sent for your firm.
- Suppressed addresses lists addresses that bounced or marked your email as spam. Structra does not send to them.
Branding
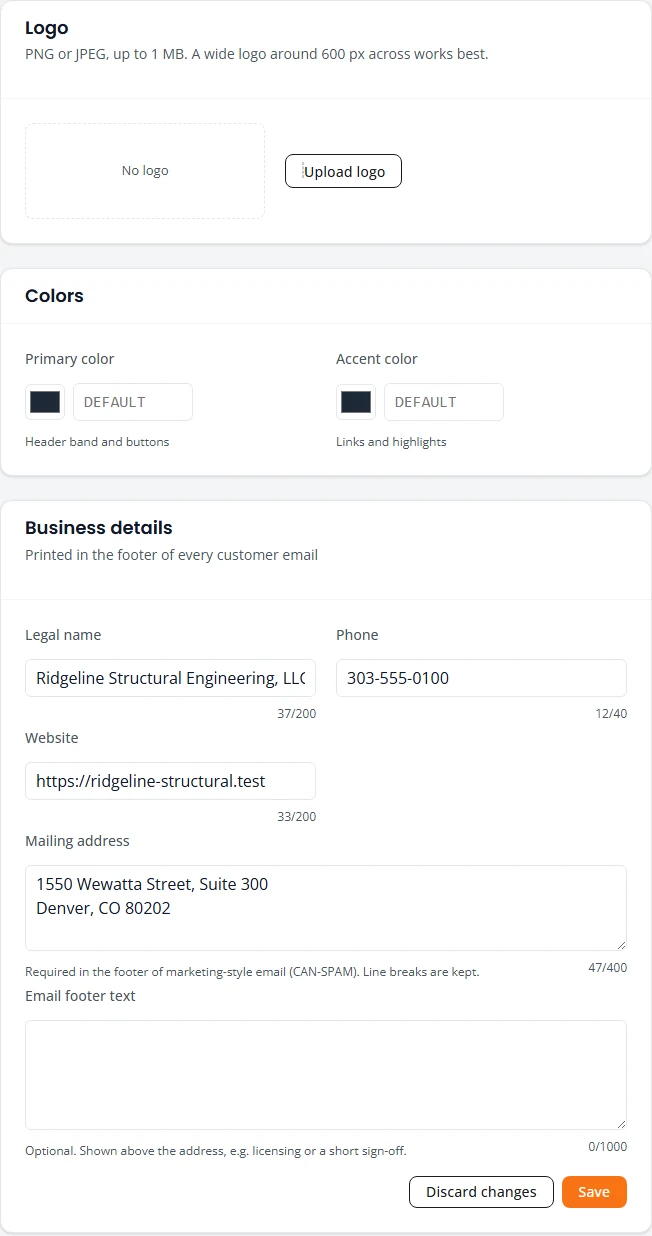
The Branding tab sets the logo, colors and contact details on email your customers receive. Its Letterhead card sets the top of your documents. See Letterhead below.
- Open Settings and select Branding.
- Press Upload logo. Use a PNG or JPEG up to 1 MB. A wide logo about 600 pixels across works best.
- Set the Primary color (the header band and buttons) and the Accent color (links and highlights).
- Under Business details, fill in Legal name, Phone, Website and Mailing address. They print in the footer of every customer email. The Phone number is also the one foremen are asked to call in inspection reminder texts. Email footer text is optional, for a licensing line or a short sign-off.
- Check the Preview on the right, then press Save.
Letterhead
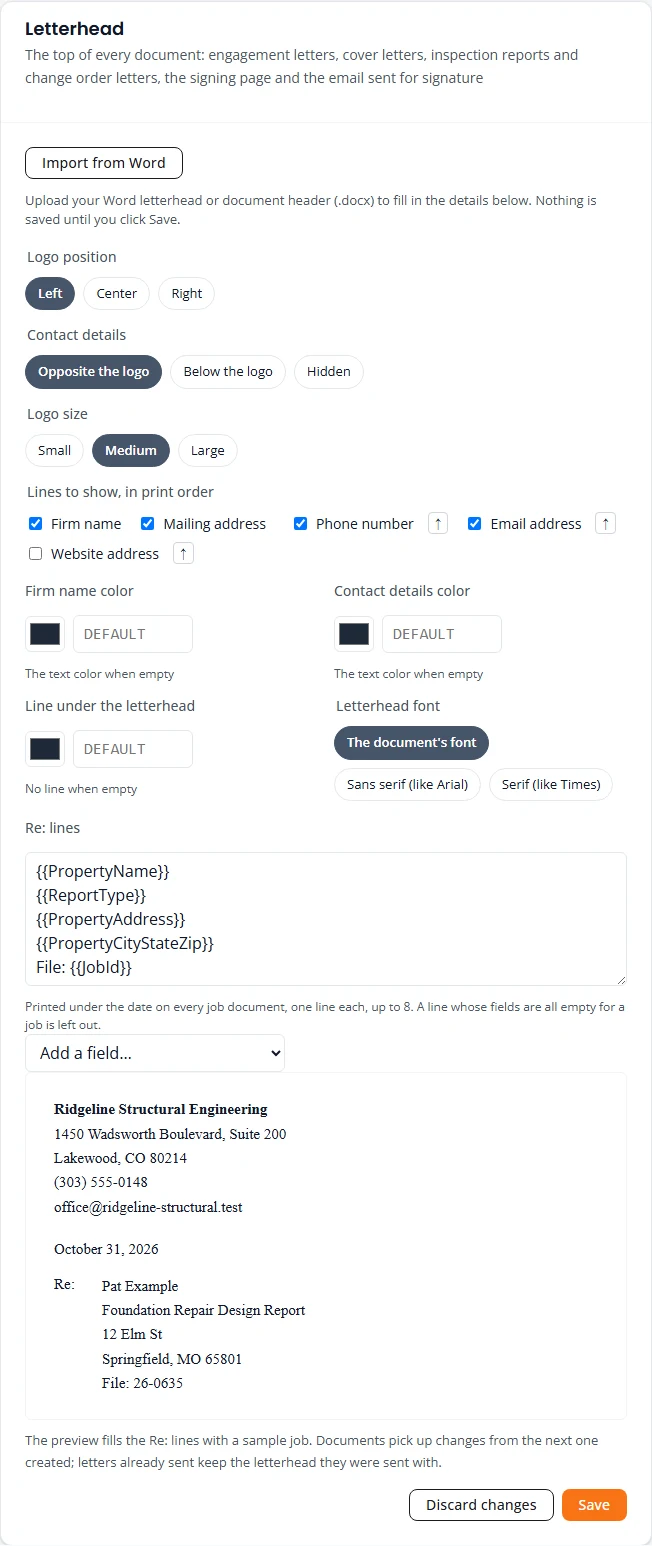
The letterhead is the top of every document Structra makes for you: engagement letters, cover letters, inspection reports and change order letters, the page where a customer signs, and the email sent for signature. It uses the logo and the Business details above, laid out the way you choose here. The preview at the bottom of the card shows the result.
- To start from the letterhead you already use, press Import from Word and choose your Word letterhead or document header (a .docx file). Structra reads the logo, the firm name, the contact details and the layout from it and fills in the page. Nothing is saved until you press Save. A note lists anything from the file that was not carried over.
- Choose the Logo position (Left, Center or Right), where the Contact details go (Opposite the logo, Below the logo or Hidden), and the Logo size. With a centered logo the contact details go below it.
- Under Lines to show, in print order, tick the lines to print: Firm name, Mailing address, Phone number, Email address and Website address. Press the ↑ beside a line to print it earlier. An import keeps the order of your Word file.
- Set the Firm name color, Contact details color and Line under the letterhead, and pick the Letterhead font. Leave a color empty for the normal text color. Leave the line color empty for no line.
- Check the Re: lines. See The Re: lines below.
- Press Save.
An engagement letter template can still be given its own letterhead instead. See Leads and engagement letters.
A change applies to documents created after you save. Letters already sent keep the letterhead they were sent with.
The Re: lines
The Re: lines print under the date on every job document, one line each, up to eight. They name the job the letter is about. As standard they are the property or homeowner name, the report type, the street address, the city, state and ZIP, and the job number.
- Each field shows in the box between double curly brackets. The preview fills them in with a sample job.
- To add a field on a new line, pick it from the Add a field… list: property or homeowner name, report type, street address, city, state and ZIP, job number, client’s reference number, client name or permit number. You can also type your own words around a field, as in “File:” before the job number.
- A line whose fields are all empty for a job is left out of that job’s documents. A job with no permit number, for example, prints no permit line.
- Use the standard lines puts the standard set back. It appears once you have changed the lines.
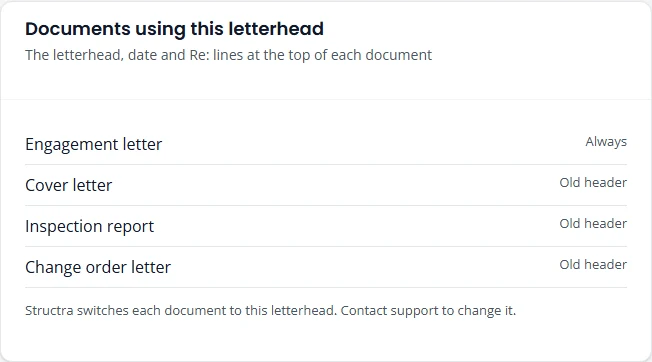
Documents using this letterhead
This card shows which documents print the letterhead. The engagement letter shows Always. The cover letter, the inspection report and the change order letter each show either This letterhead or Old header, the header your documents used before. Structra support switches each document over once its output has been checked. To ask for a switch, contact support.
Organization details
- Open My Organization and select the Settings tab.
- Under Organization Profile, change the Organization Name.
- Press Save Changes.
Cover letters
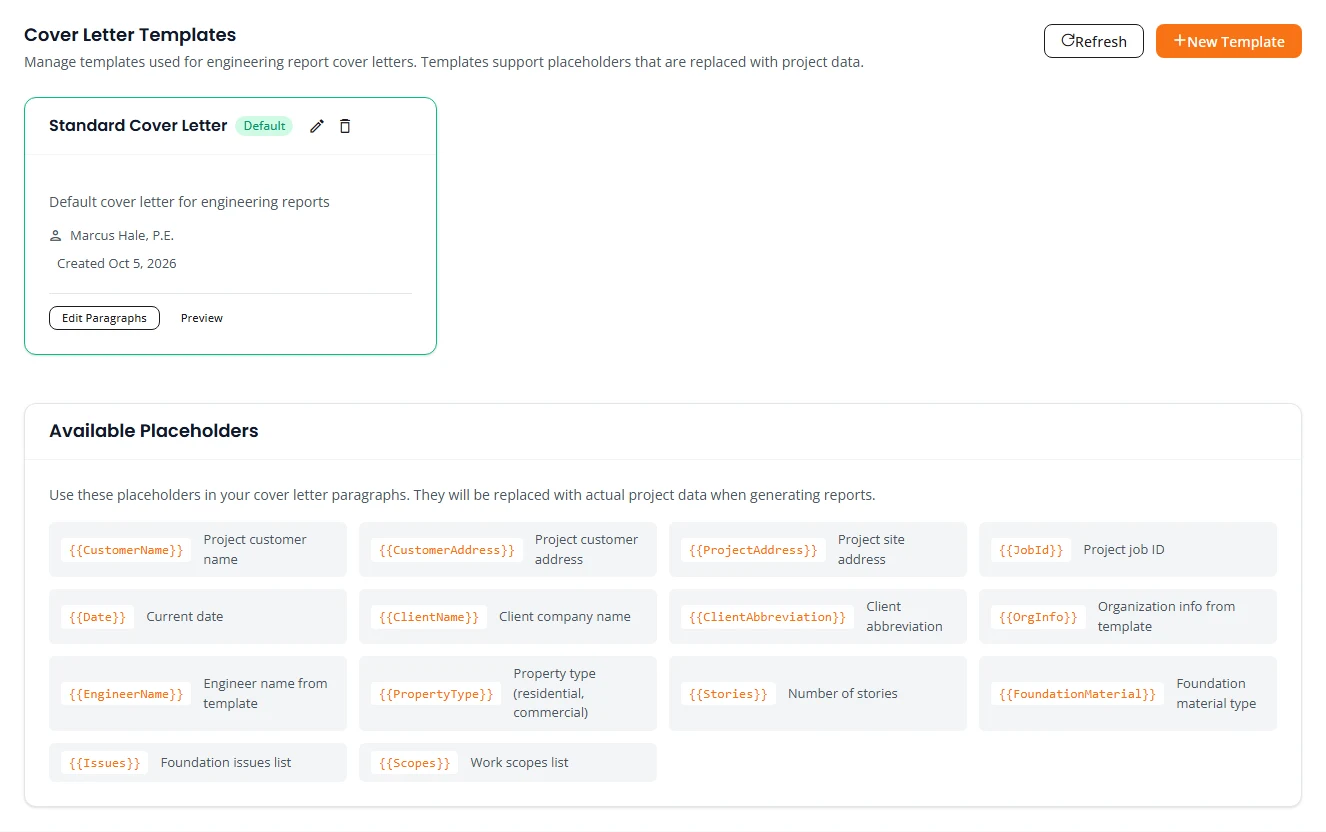
A cover letter template is the letter at the front of your engineering reports. Structra fills in the project’s details each time.
Create a template
- Open My Organization and select the Cover Letters tab.
- Press New Template.
- Fill in Template Name and Description.
- Under Organization Info, type what should appear in the letter’s header, one item per line.
- Under Engineer Name, type the name for the signature block.
- Turn on Default Template if new cover letters should use this one. Press Create Template.
Write the letter
- Press Edit Paragraphs on the template.
- Press Add Paragraph and type the text. Add as many as you need, and use the arrows to reorder them.
- Press Save Paragraphs.
- Press Preview to read it back.
Available Placeholders at the bottom of the tab lists the words you can put in a paragraph, in double braces. They are swapped for the project’s own details when a report is generated: the customer’s name and address, the project address, the job ID, the date, the client’s name, the property type, the scopes and more.
Project types and their setup
A project type is a kind of work you offer, such as Foundation Remediation or Ad Hoc. The Project Types tab of My Organization has a card for each one.
- View Details shows its features and prices. See Client pricing.
- Configure opens the setup that drives design and report generation.
Who can start a job
Each card has a Clients can start these jobs box. Ticked, your clients can start jobs of that type themselves from their own Structra login. Unticked, only your team can.
The line under the box says which applies. If it ends “(Standard setting for this job type.)”, you have not changed it. A new firm’s clients can start Ad Hoc jobs to begin with. Only an Organization Admin can change the box.
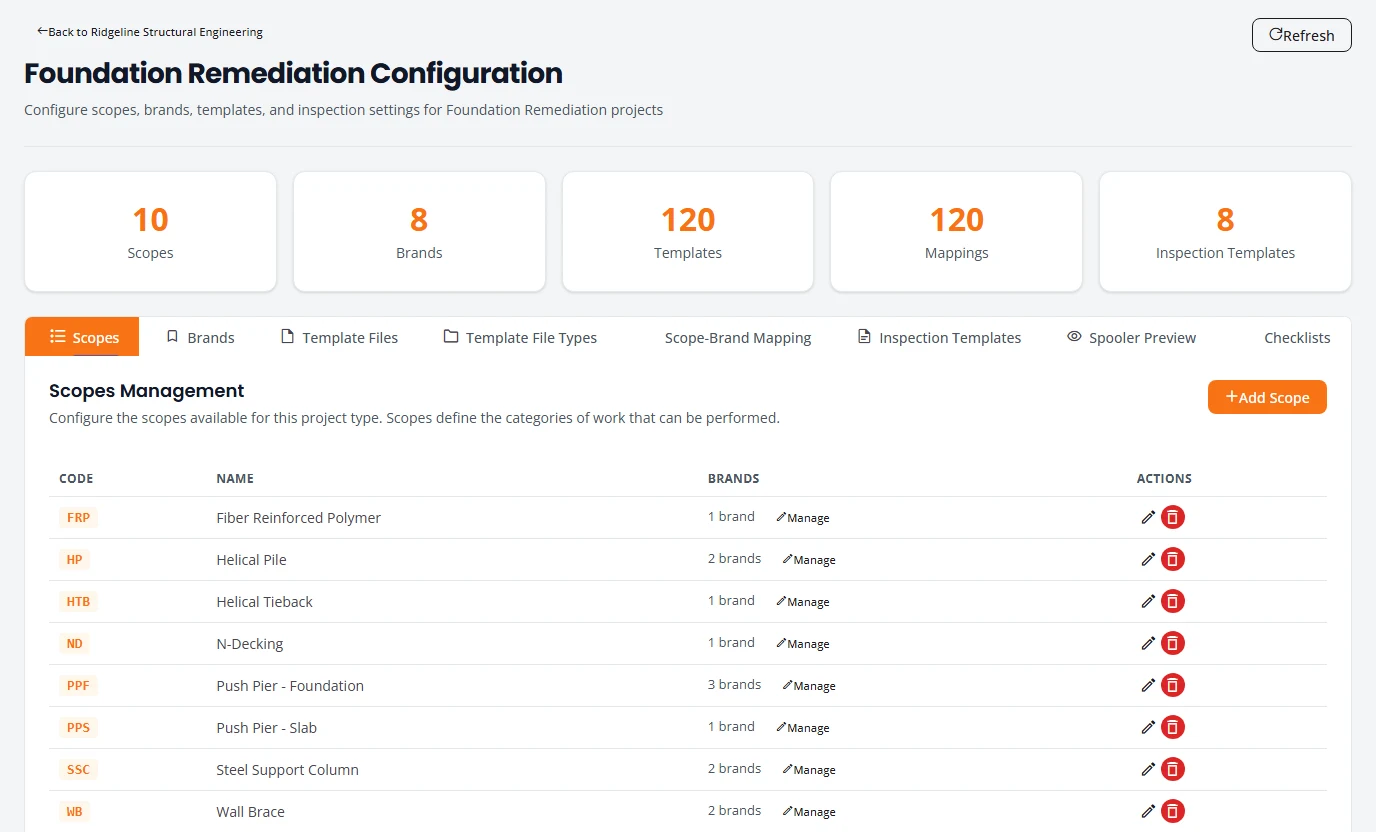
| Tab | What it holds |
|---|---|
| Scopes | The categories of work a project can include, each with a short code. |
| Brands | The brands available to your organization. Templates are chosen by brand. |
| Template Files | The files reports are assembled from, grouped by type. |
| Template File Types | The categories template files are sorted into. |
| Scope-Brand Mapping | Which template files are used for each combination of scope and brand. |
| Inspection Templates | The paragraphs used in inspection reports, for each scope. |
| Spooler Preview | The ordered list of files that will be assembled for one scope and brand. Nothing is changed here. |
| Checklists | The QA checklists for drawing and for engineering. |
Engineer credentials and signature
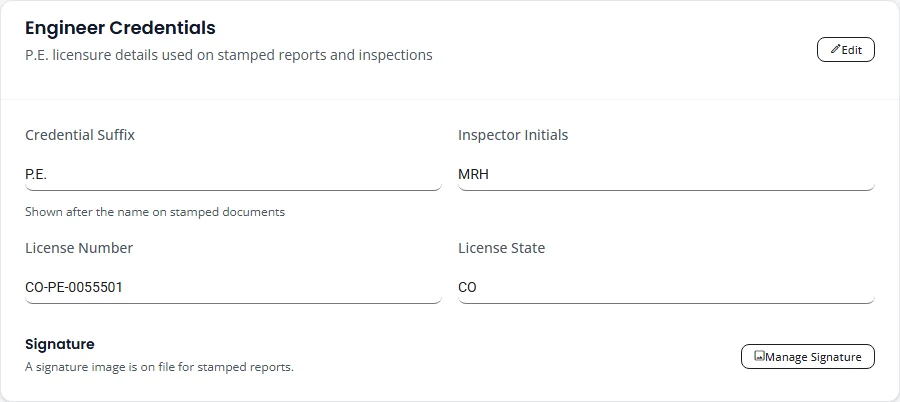
Each Engineer keeps their license details and a signature image. Structra signs cover letters, inspection reports and revision letters with the stored signature of the project’s engineer of record. There are no seal or signature files to send to Structra.
Your credentials
- Select your picture at the top right, then Profile.
- On the Engineer Credentials card, press Edit.
- Fill in Credential Suffix (shown after your name, such as P.E.), Inspector Initials, License Number and License State.
- Press Save.
Your signature
- On the same card, press Manage Signature.
- Upload an image of your signature, or press Replace Signature if one is already there.
- Press Close.
Use a JPEG, PNG, WebP or GIF up to 2 MB. A PNG with a transparent background looks best on a stamped report.
Default engineer of record
The default engineer of record is the engineer whose name goes on documents for a job that has no engineer of record of its own.
- Select your picture at the top right, then Settings, then the Engineer of Record tab.
- Under Default engineer of record, choose the engineer and press Save.
Only users with the Engineer role are listed. Make sure the engineer you choose has a signature on file.
What Structra support sets for you
Some settings have no screen yet. Email [email protected] to change any of these:
- Whether due dates can fall on a weekend. Capacity, holidays and your time zone are yours to set. See Design capacity.
- Your organization’s industry type and status.
- Which project types your organization and each client can use. Whether clients can start them is yours. See Who can start a job.
- Which documents print your letterhead. See Letterhead.
- Connecting your website’s request form to Leads.
- The email address you sign in with.
Stuck on something? Email [email protected] and tell us what you were trying to do.